Techniques > Searching > Circular Search
Techniques: Circular Search
Version date: 16 October 2016

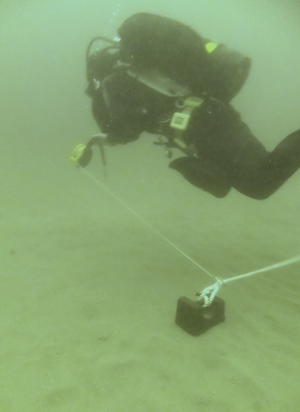
Fig 1: Shot weight and distance line
The circular search is one of the most effective ways for divers to search areas of seabed and to position any objects found during the search. The method does not require any complicated equipment, is easy to learn, is very quick to set up and can be used in poor visibility on any type of seabed.
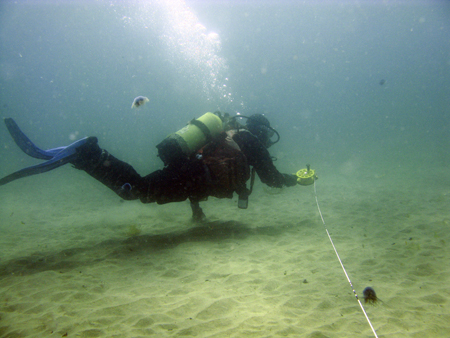
The basic principle of a circular search is for divers to carefully search the seabed in a circular pattern at a known distance around a shot weight that marks the centre of the search area. The shot weight is usually dropped from a boat on the surface, it is connected to a rope with a floating buoy attached so the weight can be recovered at the end of the search (Fig. 1). The divers are attached to the shot weight using a tape measure or a line marked with distances in metres, so they know how far they are away from the centre of the search area (Fig. 2). When a circuit around the centre point has been completed the divers move away from the centre a known distance and repeat the search pattern further out.
The distance moved away from the centre after each circuit has been completed should be the same as the distance you can see underwater. This distance can be measured on the first circuit by moving away from the shot weight until it can just be seen, then the same distance can be used for each subsequent circuit.
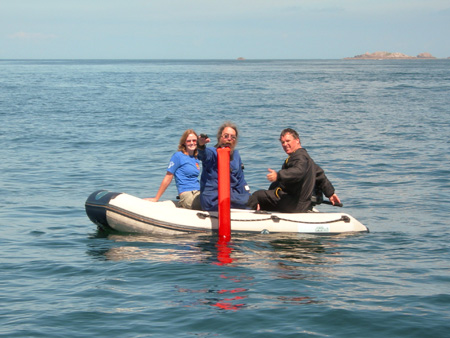
When an object is found on the seabed it can be positioned relative to the centre point by measuring the distance to the shot weight along with the compass bearing angle down the distance line from the object to the centre point. Alternatively, the divers can deploy a delayed surface marker buoy above the object so the boat crew can take a position of the buoy using the GPS (Fig. 3), the boat crew should note the buoy position as a latitude and longitude as well as the time the position fix was taken. Each object located on the search should be briefly recorded by the divers, noting the time, a brief description, the basic dimensions and including photographs if possible, see Recording Objects on Site. If the object needs to be located again then attaching yellow flagging tape will make it more visible.
The separation between each search 'lane', or how far the divers move away from the centre after each circuit has been completed, will depend on the visibility as the better the visibility the further to one side or the other the diver can see objects on the seabed. In clear water on a flat seabed searches up to 20m radius can be completed, but rocky seabeds and kelp take time to search so much smaller areas can be covered in the same time.

Fig 2: Searching over a flat sand seabed

Fig 3: Taking a GPS position fix on a marker buoy
Careful searching is essential so you do not miss anything important, having a smaller area searched thoroughly is better than a larger area searched poorly. Training and practice do improve the efficiency and reliability of seabed searches so it is often worth trying out this search method on land before attempting to do it underwater.
This search method should only be attempted during slack water, searching in a current is hard work and often results in poor coverage of the search area.
Very careful positioning of the shot weight is required for accurate searches so the boat dropping the shot line should approach the drop point at very slow speed. A shot weight of 15-20 kg can be used in shallow water as its small enough to handle on the boat but large enough to resist being dragged across the seabed. In deep water a larger shot weight may be required, attaching a small lifting bag will help recover the heavy weight to the surface.
Method
- From the boat, carefully deploy a shot line and weight in the centre of the search area, with positions guided by GPS and the boat travelling slowly
- The divers attach a distance line or tape measure to the shot weight and ensure that the line is kept tight
- Move away from the weight along the line until the weight is only just visible
- Note the distance along the distance line as this is how far you can search to one side during each circuit
- Place a marker or scratch a mark on the seabed where the search started and note the compass bearing back to the shot weight
- Swim in a circle around the shot, searching for objects on both sides all the time, while keeping the distance line tight
- Stop when the seabed marker is reached or when the compass bearing back to the shot weight is the same as it was at the start. One circuit around the search area has been completed.
- Move along the distance line away from the shot the same distance as before noted in 4. above
- Repeat the search circuits until the required area has been searched or the planned dive time completed
- If any objects are seen, note the distance and compass bearing from the object back to the shot
- Or, deploy the delayed SMB, wait for the boat crew to take a position fix. Once positioned the crew can quickly deflate the marker buoy so it can be reeled in by the divers.

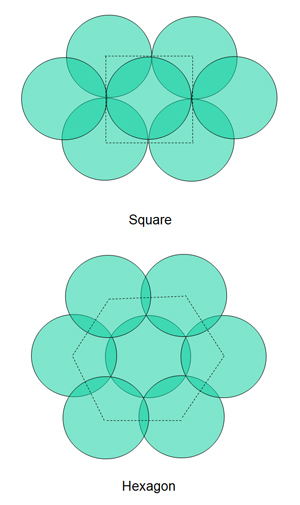
Fig 4: Search patterns
The aim is to find objects, not just cover the ground in the quickest time.
- A smaller area searched thoroughly is better than a larger area searched poorly
- When searching in kelp or weed attach the distance line on the shot line above the top of the kelp
- When searching for iron objects in kelp or objects that may be buried a diver-held magnetometer such as an Aquascan DX-300 is extremely useful
- Always complete a search even if an object is found as there may be more objects in the same area.
Search Patterns
When covering a large area the searches must form a pattern on the seabed (Fig. 4) that ensures that the whole area has been searched. The square pattern is the easiest to set up as the centre points of each search are on a grid and are easy to calculate. The hexagon pattern is the most efficient but it can be more difficult to calculate the centre points. If you use the Site Recorder program for planning the search then the centre points are computed automatically as part of the planning process.
Other Search Methods
There are a number of other search methods that have been tried such as a jackstay and swimline searches but they are best avoided. These other methods require ropes and weights to be set up on the seabed or co-ordination between many divers underwater, both of which are time-consuming and prone to failure in all but the most ideal conditions.
Equipment List
- Shot line - Use a 15-20 kg weight, a large fender as a float and rope at least 10 mm diameter
- Distance line - Use a reel and line marked in 5m increments or a tape measure
- Hand held GPS - To take a position fix of the shot line buoy and delayed marker buoy on the surface. Use a WAAS enabled GPS receiver where the corrections are available.
- Seabed marker - Use a tent peg with streamers of yellow flagging tape
- Drawing slate - An A4 or A5 size PVC slate, pencil and waterproof paper for making notes
- Compass - A divers hand bearing compass
- Delayed SMB - A delayed marker buoy for indicating when the object has been found
- Flagging tape - Bright yellow flagging tape is used to mark objects that have been found
