
Techniques Techniques > Recording > Recording Cannon


Techniques: Recording Cannon
Version date: 18 March 2017
Information on this page is courtesy of Kevin Camidge (CISMAS), Ruth Brown and Kay Smith (Basiliscoe).
Click on any image below to show a larger version.
Introduction
Shipwreck sites have often been found by divers coming across a cannon on the seabed and as cannons show up well on marine geophysical surveys these sites can be found that way too. Like anchors, cannons are strongly built and can survive underwater where smaller items may get eroded or washed away. So sometimes the most obvious things to survive on a shipwreck site are cannons and anchors. These large objects survive as markers to identify the location of a shipwreck site but they also contain information that provides clues about the wreck itself so recording them properly is important.
Note on names: Here we use the common terms 'cannon' to refer to artillery pieces that fire 'cannonballs', but more correctly we should be referring to 'guns' that fire 'round shot'.
Cannons made in different ages, in different countries and by different manufacturers include noticeable differences in style. From these variations we can tell something about the age or nationality of the cannon which can then provide hints about the age and origin of the shipwreck it came from. But cannon get moved from one ship to another, they get captured and put on foreign enemy ships andthey can be in use for a very long time so these clues may be just hints rather than hard evidence. The size of a cannon usually tells us something about the size of ship that carried it as you need a big ship to carry big cannons.
Cannons are made of two different metals, cast iron and bronze. Most cannons were made of cast iron and that is the kind most often found by divers. The material used to make the other type is variously known as bronze, brass or copper alloy, although the material used to make them is not a true bronze but is some alloy of copper. For simplicity, here we shall refer to them as bronze guns.
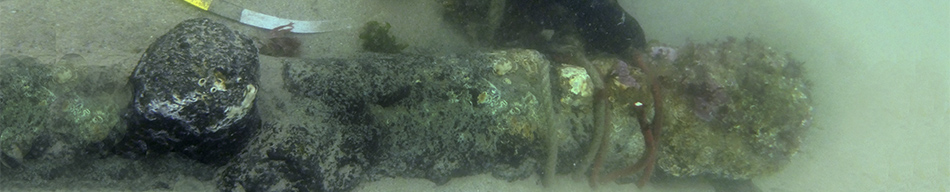
Guns made of iron will rust in air so when kept in service they needed to be oiled or painted. When dropped on the seabed from a ship during a wrecking the iron guns will start to corrode, but being in sea water they will corrode faster and in a different way than they would in air. As the gun corrodes the outside forms a thick, hard concretion which eventually slows the rate of decay allowing the cannon to survive long enough for divers to find it. The thick concretion that preserves the iron gun also hides the details of the gun itself so the outside starts to look organic rather then something man made. With a covering of weed or marine growth the gun will start to look like a rock, so much that sometimes they can be hard to find, see the examples below. Photographic scales have deliberately not been included in these example photographs to make the cannon look more rock-like and harder to see to show this effect.
_800.jpg)
Fig 1: Cannon on the Mewstone Ledge site
_800.jpg)
Fig 2: Cannon on the Coronation (1691)
_800.jpg)
Fig 3: Cannon on the Ramscliff site, hidden under a rock
The concretion can be removed to reveal the detail of the cannon but it is difficult to do and should not be attempted by the inexperienced. The cannon can be heavily and permanently damaged in the process if not done well. Worse still, the metal of the cannon inside its protective coccoon of concretion was corroding very slowly but once removed the metal will again start to corrode very quickly.
Bronze guns corrode at a much lower rate and they develop a thin green patina rather than a concretion, so a bronze cannon underwater often looks much like a bronze cannon does on land. Being not heavily concreted a bronze gun is much easier to record.
As well as chemical attack both iron and bronze cannon will be subject to physical erosion especially if they are in shallow water. Parts of the gun may be eroded away or details worn down so they are no longer visible, sometimes they become so eroded that they do not look like a cannon at all
Parts of a Cannon
The names used for parts of a cannon can vary so in the guidance below we will use the names shown in figure 4:
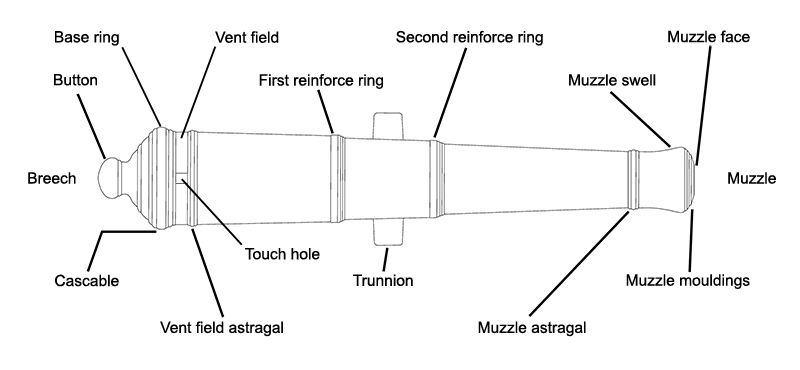
Fig 4: The parts of a cannon
- The Muzzle is where the shot comes out and is considered to be the 'front' of the cannon, this is usually the narrower end of the barrel
- The other end of the gun is called the Breech. The widest part of the Breech is the Base Ring and behind this is the Cascable (or Cascabel), with the Button right at the end.
- The Touch Hole is on the top at the back, just in front of the Base Ring, and the Vent Field is the area around the Touch Hole between the Base Ring and the Vent Field Astragal
- The Bore is the hole down the centre of the cannon from the muzzle towards the Breech.
- When in use the cannon is mounted on its Trunnions, these act as a piviot so it can be angled up and down on its Carriage.
- The Mouldings, Astragals and Reinforces are rings around the barrel, they are for decoration and the gun would work just as well without them.
For an iron gun covered in concretion it may be impossible to identify any detail features such as the mouldings, astragals and reinforces.
Tools
A cannon can be recorded using the simplest tools:
- The simplest tool for recording cannon is a fibreglass builder's tape measure, this can be used for measuring lengths along the gun and it can also be used for measuring the circumference of the barrel and trunnions.
- The next most useful item is a folding rule as often it is easier to make smaller measurements with a rule rather than a tape measure.
- Having a pair of large callipers will allow you to measure the diameter of the cannon rather than the circumference so more accurate measurements can be made.
- A profile gauge can be useful for copying the shape of mouldings and the shape of the cascable.
Recording Cannon
Most of the cannon you will see will be made of iron and those found underwater will usually be covered in concretion and may possibly be eroded. As the concretion hides the details two forms have been developed for recording guns, a simple form that captures the essential measurements of a concreted iron gun and a very detailed recordingform that can capture all of the information about an iron gun on land, a de-concreted iron gun in a museum or a bronze gun. The forms have been developed by Kevin Camidge at CISMAS and they have since been used on many shipwreck projects all ovet the world.
Along with the form it is usual to take a series of photographs of the gun as part of the recording process. Some details of the gun may show up in the photograph that were not visible when the gun was recorded.
The Simple Cast Cannon Recording Form
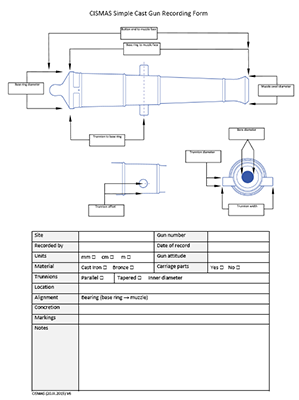
This form is for basic recording of cast iron and brass cannons, it is intended for use underwater and where concretion or wear makes recording of fine detail impossible. Waterproof forms can be made by printing the form on laser-printable drafting film in a laser printer. If your cannon is covered in concretion (a hard crust formed from corrosion products, especially on cast iron cannons) then measure over the concretion and do not try to remove it.
Measurements:
- Record the measurements in the boxes indicated on the form, preferably in millimetres. If you use units other than millimetres make sure you record (in the tick boxes) which units you have used
- The diameter measurements are best taken using a large pair of callipers. If you do not have callipers, then measure the circumference and precede the measurement with a large ‘C’
- The simple form requires just nine measurements and some observations to be filled in, the form clearly shows which measurements to make
- Note that measurements should be made from the rear edge of the base ring, this is usually the widest part of the cannon
- The bore or calibre can be hard to measure accurately if the cannon is heavily concreted so make a few measurements and record the largest diameter for the bore.
- if possible, try to measure the bore a little way down the barrel as the bore may be worn and the size at the muzzle face may be slightly larger
- Measurements should be made to the centre of the trunnions
Observations:
- Site - The name of the site. On land, record the name of the location or nearest building; underwater, the name of the wreck (if known). If the gun is on an archaeological site, the site code should be used.
- Gun number - On sites with more than one gun, the guns should be given numbers.
- Recorded by - The name of the person (or persons) recording the gun.
- Date of record - The date the gun was recorded
- Units - Tick one of the boxes to indicate the units in which the measurements are recorded
- Gun attitude - Mainly applicable to guns underwater. State whether the gun is ‘right side up’, ‘upside down’ or ‘on its side’. On land the gun will often be on a carriage (usually a reproduction); state ‘on carriage’.
- Material - If black or rusty tick cast iron but if green or shiny then tick bronze. If unsure put ‘?’ in the box you think most likely.
- Carriage parts - For use where original carriage parts survive (usually underwater).
- Trunnions - Tick for parallel or tapered trunnions as appropriate. If the trunnions are tapered, record the outer face diameter on the gun diagram and the inner (larger) diameter here.
- Location - Give a position derived from a hand-held GPS if possible: latitude and longitude at sea or an OS grid reference if on land. If you do not have access to a GPS then estimate the position from a chart or OS map. Please state in the notes section how the position was obtained (GPS or estimated). If on land, give the street address of the gun in the notes section.
- Alignment – Take a compass bearing along the gun (from the base ring to the muzzle). With iron guns you will need to stretch a string or tape along the gun to get the compass away from the gun.
- Concretion - State ‘None’ if the gun is not concreted. Otherwise, give an estimate of the thickness of the concretion. If this is not possible, simple record ‘concreted’ followed by an estimate of the percentage of the gun covered by concretion.
- Markings - Any visible markings or numbers should be noted along with where they are on the cannon. Make reference to photographs and sketches or rubbings made of the markings. Dont forget to check the face of the muzzle for markings too.
- Notes - Any other features of note should be recorded here. You should also make a sketch of the gun, either on the back of the form or on a separate piece of paper. Take lots of photographs. Take one from the side of the whole gun as well as lots of detail/ close up pictures. On land, if the gun has an associated sign make a note of it here as well as photographing the sign.
_450_full.jpg)
_480.jpg)
Fig 6: Using callipers underwater to record the base ring diameter of a concreted gun
Photographs for Recording
A standard set of photograph views have been defined which taken together should be a complete record of a cannon. On land it is usually possible to get all of the photographs especially if the cannon is raised up on a carriage. When photographing a cannon underwater you usually get what you can, the cannon may be partly buried or heavily concreted.
List of photographs to record a cannon:
- General view showing the gun and its surroundings
- Side view of the whole cannon, taken from the same level as the barrel, both left side and right side (Fig. 7)
- Muzzle face – looking straight down the bore
- Detail of the side of the muzzle, at right angles to the end of the barrel (Fig. 8)
- Breech of the gun looking straight at the cascable, looking down at an angle of 45 degrees (Fig 9)
- Breech of the gun looking straight at the cascable, from the top (Fig. 10)
- A close up side view of the breech mouldings
- A close up of the touch hole and vent field, looking straight down
- A close up of the base ring
- Detail of the end of the trunnions, on both sides (Fig. 11)
- Detail of each astragal and reinforce (moulding) along the barrel (Fig. 12)
- Details of all markings and crests (Fig. 13)
- Three-quarter view if the gun from the front, the muzzle end (Fig. 14)
- Three quarter view from the back, the breech end (Fig. 15)
- Any other photographs that may be useful
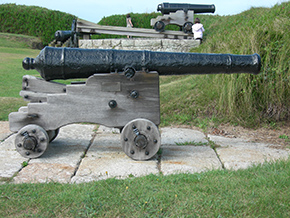
Fig 7: Photo 2, side view

Fig 8: Photo 4, side of muzzle
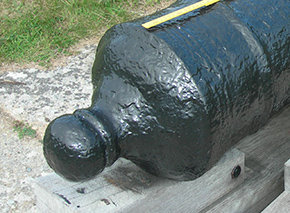
Fig 9: Photo 5, breech from top
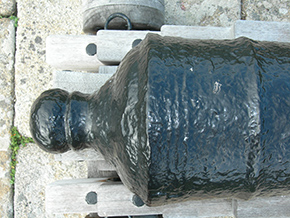
Fig 10: Photo 6, breech from top
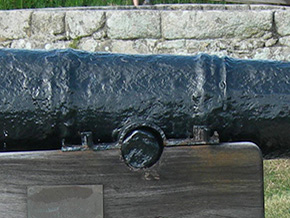
Fig 11: Photo 10, trunnion detail
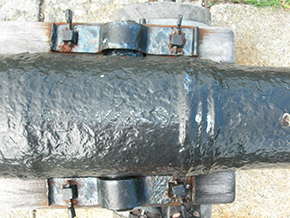
Fig 12: Photo 11, detail of second reinforce
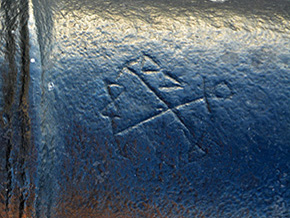
Fig 13: Photo 12, markings and crests
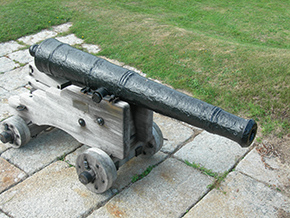
Fig 14: Photo 13, three quarter view, front
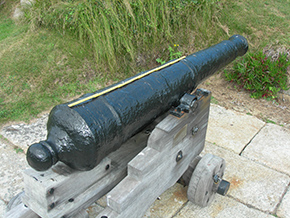
Fig 15: Photo 14, three quarter view, back
Other Types of Gun
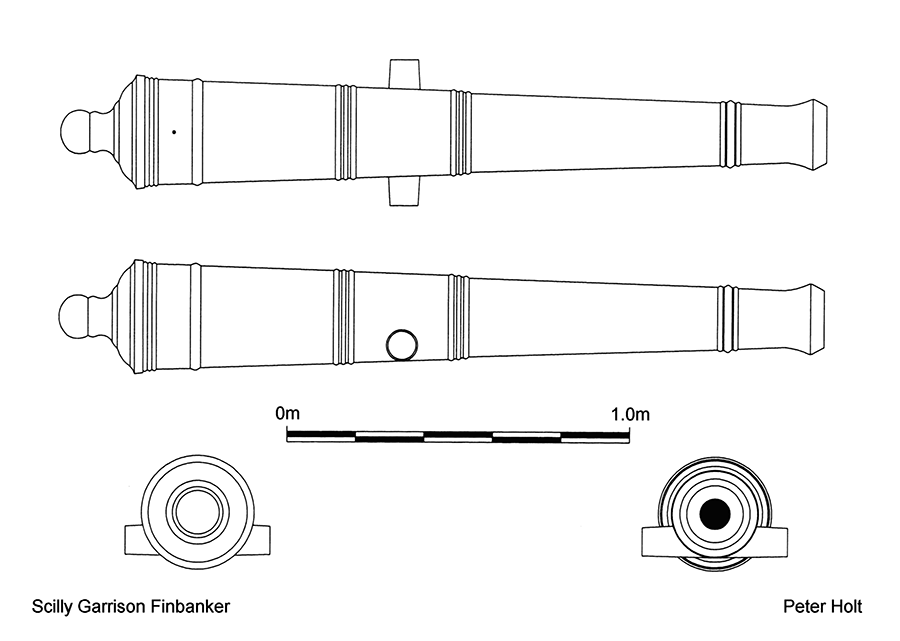
Fig 16: Drawing of the Scilly garrison gun shown in the photographs
Wrought Iron Guns - Some older types of iron cannon were made from pieces of wrought iron, often put together in a similar way to a wooden barrel but using hoops and staves of iron rather than wood. The basic dimensions of this type of cannon can be recorded in a similar way to a cast iron cannon but detailed recording should be done by an expert as information about how the cannon was made is very important.
Mortars - Measure the bore or calibre and the overall length
Howitzers - Measaure the same as an ordinary gun
Carronades - It is important to measure the bore inside the barrel as the bore at the muzzle face is wider.
Detailed Recording Form (Advanced)
Another form can be used for recording a cast gun in detail where there is no concretion covering the details. The notes explain how the form should be used:
- Click here to download the Complex Cast Gun recording form
- Click here to download the Complex Cast Gun recording form notes
Other Methods - 3D Photogrammetry
In recent years 3D photogrammetry has become very popular and it has been used to successfully record cannons. The method is appropriate when the actual cannon itself is being photographed as the 3D model is then of the cannon but it is not appropriate for recording concreted iron guns.
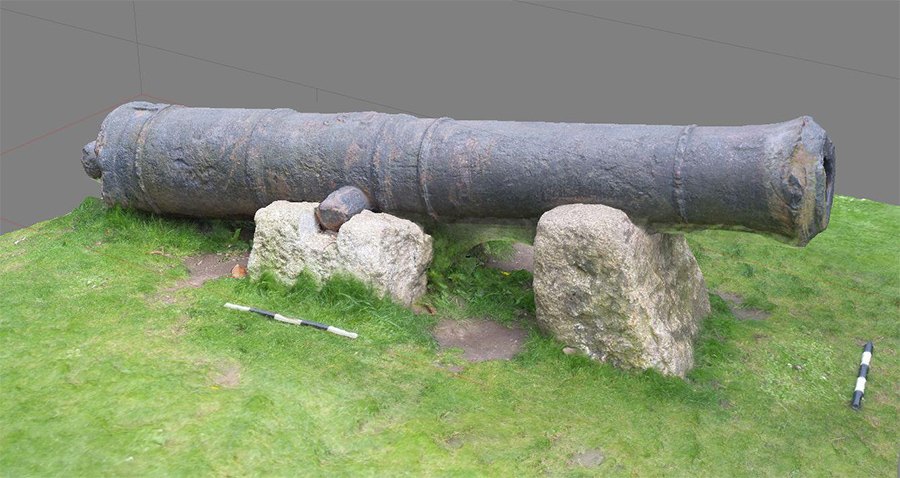
Fig 16: 3D computer model of the Morrab Garden gun (CISMAS)
Firstly, the 3D model is of the concretion and not the gun so the shape and texture of the surface is largely meaningless. Each 3D model contains a huge amount of data that has to be archived and stored while only 20 or so numbers are required to record a concreted iron cannon. Many 3D photogrammetry models of cannons do not include a scale or survey ground control so the dimensions of the cannon cannot be determined. Models without a scale may have some use for public outreach but they are not useful as a scientific record of the cannon itself.
Recommendations
- Use the cannon recording forms to help ensure you record all of the information about a cannon
- Include all the views listed above when taking photographs
Equipment List and Forms
- Tape measure
- Large callipers
- Simple cast gun recording form
- Notes for simple cast gun recording form
- Complex cast gun recording form
- Notes for complex cast gun recording form
- Carronade recording form
Links and Documents
- Encyclopedia of Markings and Decoration on Artillery, Mendel Peterson & Robert Stenuit (Ed.)
- British Cannon Design 1600 - 1800, by Dr A R Collins
- British Smooth Bore Artillery: A Technological Study, David McConnell, 1988
- The Development and Design of Bronze Ordnance - Sixteenth through Nineteenth Centuries, Chuck Meide, 2002
- 16th Century Cast-Bronze Ordnance at the Museu de Angra do Heroismo, Sara Hoskins, 2003
- The Carronade, C Spencer Tucker, Nautical Research Journal 1997
- 3D Photogrammetry gun recording tests, in HMS Colossus Sediment Level Monitoring 2014
- The Ordnance Society - Ordnance and Artillery of All Periods