

Techniques > Sites > Severn Collier (1965)
Site: Severn Collier Hull Photomosaic
Techniques: Photomosaic, Foreshore


|
In 2012 the Friends of Purton and maritime archaeology students from the University of Bristol recorded the remains of the wooden towed barge Severn Collier, one of the many abandoned ships that for the Purton Ships Graveyard. The ships were originally beached to strengthen the nearby canal bank that was eroding away.
The Severn Collier was built in Stourport in 1937 and was finally abandoned at Purton in 1965. The Friends of Purton are actively engaged in a systematic programme of archaeological surveying, photography and meticulous recording of each vessel for posterity.
Click on any image below to show a larger version.
Aims
The aim of this exercise was to produce a detailed photographic record of the starboard side of the Severn Collier.
Method
The 11m long remains of the side of the ship were recorded as a vertical photomosaic, the method was suitable on this vessel because the hull had flat sides. A tape measure was laid on the ground alongside the hull and was used as a guide to ensure that all of the photographs were taken at the same distance from the hull. Photographs were taken at right angles to the tape baseline ensuring that the vertical angle of the camera remained the same in each of the 14 photographs. Only the centre of each photograph was to appear in the finished mosaic so each photograph overlapped with the next by between 30% and 50%.
Fig 1: The starboard quarter of the Severn Collier showing the area of hull that was recorded
Fig 2: The same section of hull seen from the port side
Processing
The photographs were merged into a single mosaic using Adobe Photoshop. The images were affected by a small amount of barrel distortion, this could be seen by looking at the scale bar in some of the photographs as the bar appeared to be curved. One image showing the scale bar was straightened then the same correction was applied to all of the other images. The raw images were a higher resolution than was needed so they were made as small as possible while still allowing the details to be seen, this kept the final mosaic image to a manageable size. The images were then aligned next to each other one at a time; starting in the middle of the mosaic then working to the left and right helps to reduce the effects of any misalignment. The overlapping image can be set to 75% transparency to make it easier to line up features in both images.
- The images were opened in PhotoShop
- The images were reduced in size
- The distortion was corrected using the Lens Correction tool
- A background image was created slightly bigger than required and each of the raw images was copied and pasted on to it as a separate Layer
- The images were then aligned next to each other, correcting for any differences in rotation and scale using the Transform tools
- Any visible edges between images can be smoothed using the erase tool set to 20%.
- The final combined mosaic image was then saved
Fig 3: Separate images (A) were merged together into a single, seamless image (B)
Fig 4: The completed photomosaic (click to see the full size image)
The completed mosaic is shown in figure 4, click on the picture to show the full size image. The mosaic is detailed enough to be able to record each timber and to determine the size and type of fixings.
Panorama Image
Many cameras can now produce panorama images by sweeping the camera around in an arc. For comparison the panorama of the same hull is shown in figure 5, this shows the same structure as the mosaic but is very distorted with the centre part of the hull closest to the camera shown much larger then the two ends. The panorama is a quick way to record the structure and is useful for helping explain a site but the image is not parallel to the hull all along its length (as can be seen at the two ends) so is not useful for making a measured record of the structure.
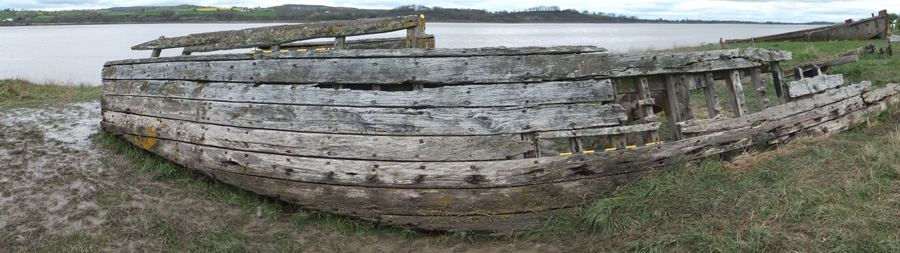
Fig 5: Panorama image of the same section of hull